Tuesday, February 26, 2013

Knitted Skinny Headband with Bow

Tutorial


Craft Inspiration


Hey guys!

So this tutorial is inspired by yet another pin that I found on Pinterest. I've done knitted headbands before, like my Cinched Headband, and I've done Knitted Bows before, but this one is a combination of the two. 

This is a skinnier headband than I've done before. The band is actually about half the width of the bow, but I like it a lot! 


Here are the supplies you'll need:
  • Yarn
  • Knitting needles
  • Scissors
  • Embroidery needle


I absolutely fell in love with the color of this yarn when I saw it in Michaels! It looks darker in the picture than it actually is.

Anyway...


Step 1: Cast on 10 stitches 


Step 2: Continue knitting until you have a band that fits around your head.

Cast off.


Step 3: Using the embroidery needle, sew together the two ends of the headband, making it a full circle.


Step 4: To make the thicker bow, cast on 20 stitches.

Then follow my Knitted Bow Tutorial for instructions on the bow portion of the headband.


Step 5: You should then collect the following items: A completed bow, a plain headband and some leftover string.

Use the leftover string to tie the bow and the headband together. I would recommend putting the cinched part of the bow over the sewn together part of the headband in order to disguise the sewing job. 

Once you've tied the knot, wrap the leftover string around the headband and cinched bow several times to keep the two together and to cinch the headband a little as well.


You are then left with your final product!

If you have any questions about this tutorial or if you would like to share your own versions of this craft, please post below in the comments.

Happy crafting!
-Micayla

Sunday, February 17, 2013

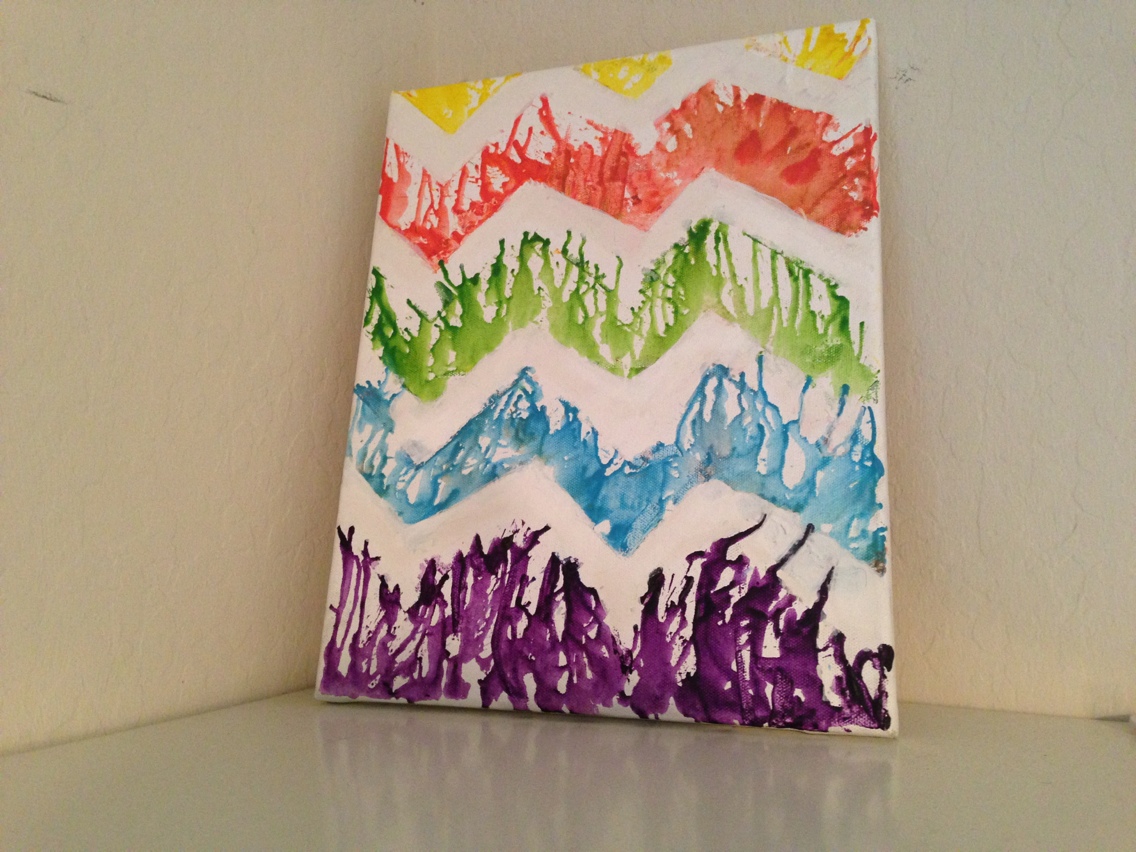
Chevron Melting Crayons

Tutorial


Hey guys!

First of all, I just want to say THANK YOU SO MUCH for helping me hit over 1,000 page views! It's a huge milestone for me and it really meant a lot. So keep coming back so I can hit 2,000!

Craft Inspiration
So this project was inspired by this pin that I found on Pinterest. I've already done the normal rainbow dripping crayons project and I felt like the chevron pattern would be a cool project to do next.

I decided (partially because of my smaller canvas) to make my pattern thicker and use less colors.

I read the blog that did the tutorial for this project but there weren't step by step instructions and also, she used the 'crayons-in-the-hot-glue-gun' method while I chose the hairdryer method.

I've never used the hot glue gun for anything more than gluing things down but I imagine that putting crayons through the gun leaves it a little messy, so I chose a different (and hopefully neater) path.


Here are the supplies you'll need:

  • Canvas
  • Crayons (Only about 5 or 6)
  • Scissors
  • Tape (I wouldn't recommend duct tape)
  • Hairdryer
  • Ruler
  • Newspaper
  • White paint (For covering mistakes. Optional.)

Step 1: Choose your colors.

I picked out 6 colors but only ended up needing to use 5. 

How many colors you end up using all depends on the thickness of your chevron pattern and the length of your canvas.

You can use the ruler to measure out how thick you want each chevron to be and then see how many crayons you'll need.


Step 2: Peel the crayons.


Step 3: Make the tape into a zig zag formations, and then make an exact replica. 

Now, I used duct tape, but it wasn't the best choice of tape. It stuck to the canvas, but a little too well once I turned on the hairdryer. There were bits of residue from the duct tape once I tore it off, but luckily it got covered by the dripping crayons.


Step 4: Use the hairdryer to melt the crayons.

What I realized works best is holding the hairdryer parallel to the canvas so that the hot air blows down, parallel to the canvas. If you just blow the hot hair straight on (perpendicular)  to the crayon, then it sprays out crazy and doesn't drip nicely. 

The problem with the hairdryer method is that the melted crayons are really unpredictable. They sometimes spray all over the place and can be super frustrating, but eventually you'll get the technique down.
If not, don't worry, I have a cheating solution that I used. 

Here's a close up of the crayon/hairdryer. 

What I would recommend doing to make the chevron pattern look better, is tracing the outline of the tape with the half melted crayon. That way there is a bold chevron pattern, and then crayons melting down.
I felt like that little step would make my project look better, but it's up to the individual artist.

**Note: Save the leftover crayons- you may need them later.


Step 5: Move the tape up.

Now here is when it starts to get a little messy and frustrating.

It's at this step where you realize that it doesn't look as good as you thought or where the tape sticks or where you see the crayons spattering in unwanted areas but IT'S OKAY. 

Like I said earlier, I found a way to (kinda) fix the mistakes. 


Step 6: Repeat the process for each chevron.

Now I realized halfway through that you need to cover the already melted crayons in newspaper or something because the other colors will sometimes mix together. 

What I did was cut a big piece of newspaper and tape it onto the canvas to hide the finished part of the project. But in order to let the top parts drip correctly, you need the full "V" so I taped the big square at the trough (or lowest point) of each zig zag and then took smaller pieces and taped them on the peaks (or highest parts) in order to cover everything but also leave the full shape.

This is why I had you make two of the same chevron patters- to stop the crayons from dripping down.


Okay, this WAS my final product before I cheated and fixed my project up a little.


To fix my mistakes I first took out a butter knife and tried to chip away at some of the dried crayons to make it look better. Then, after not much was changing, I took out some white paint and began painting over my mistakes. 

This worked surprisingly well, just make sure to paint a layer...then wait...and then paint another layer. You definitely need multiple layers and if you're impatient like me, you need to remind yourself to wait and let the first coat dry before painting on another coat.


Here's my final product (again). You can play around with which side is up, and which side is down. I ended up liking my project better when it was upside down.

Well, if you try out this project, let me know in the comments how it goes or if you have any questions! 

Happy crafting,
-Micayla

Friday, February 1, 2013

Knitted Chunky Scarf

Tutorial


Hey guys! So I found this pin on Pinterest of how to knit a scarf on your arm and I thought it was so cute and seemed easy to do! 

I tried to follow the video featured on the blog linked to the pin, but I didn't find her video to be very helpful when it came to technique, so I searched for a better video and found this one.


I however didn't have extremely chunky yarn so I had to modify the tutorial.

Here's what you'll need:
  • Yarn
  • Scissors
  • Arms
So if your yarn is chunky, you can cast on 5 or so stitches like the video does, but if you're like me and only have thin yarn on hand, I casted on about 12-15 stitches to make it as wide as a normal scarf. 

Step 1) Cast on (see video)

Step 2) Knit! (see video)

This is what it begins to look like.

Because the yarn was so thin and I was making an infinity scarf, I made it long enough to wrap around my neck three times to make it look more bulky. 
If your yarn is thicker, you can knit a shorter scarf.

Step 3) Cast off (see video)

Step 4) To tie the ends together and make it an infinity scarf, I literally just tied four knots along the ends. Once I put on the scarf I make sure that the knots are in the back so no one can see. If you want to connect the scarf the right way, you can see  the video below starting at around 9:13.


I plan on doing another one of these and doing it with thicker yarn, so hopefully it'll turn out even better!

Happy crafting,
-Micayla


Wednesday, January 30, 2013

Hex Nut Bracelet

Tutorial


Hey guys!

So one of my first pins on Pinterest was some of those hex nut crafts where you braid the hex nuts into the fabric and then wear it as a bracelet or a necklace. On a random trip to OSH I bought some hex nuts but never got around to making it back then, so I decided to finish it this afternoon!

I was searching for a tutorial online because braiding the hex nuts into a bracelet proved harder than I though it'd be, but I couldn't find any so I made my own variation of the craft that's MUCH easier.


Here's the supplies you'll need:
  • Hex nuts (Quantity depends on what you want to make. I made a bracelet and used 14.)
  • Ribbon or yarn - a LOT of it. I used about 10 feet of yarn cut up into three sections. 
  • Scissors


Step 1: Take your 10 ft long string of yarn or ribbon and cut into three equal sections.

Step 2: Tie a knot connecting the three strands of ribbon or yarn. I had to tie my yarn 2-3 times, putting each knot over the last, to make sure that the hex nut wouldn't slide over it and my ribbon only once. 

Step 3: Slide on a hex nut.

Step 4: Tie 2-3 knots on top of each other for yarn or only once for ribbon to hold hex nut in place.

Step 5: Repeat this step until all of your hex nuts are tied securely onto the ribbon or yarn.


Step 6: Tie ends together to make bracelet (or necklace).


And you're finished!


Hope you guys enjoyed this tutorial! It's a lot easier than the braided hex nut crafts but still gives the same effect.

Happy crafting,
-Micayla

Thursday, January 24, 2013

Knitted Quilt Pillow

Tutorial


Hey guys!

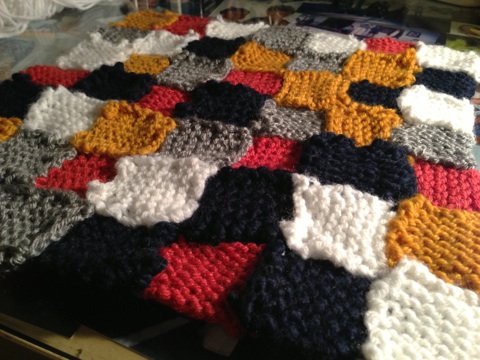
So, like any high school senior, college is the number one thing on my mind currently. But since I'm obsessed with room makeovers and Pinterest, my future dorm room is also a often thought about topic. When planning the color scheme of my dorm room, coral immediately came to mind, but I had no idea what would go with it... until I pulled out my yarn.

I found that I liked the color combination of coral, white, grey, yellow and navy blue, so I decided to make a throw pillow that will hopefully be sitting on my new bed next year!
Craft Inspiration


I got my inspiration from this pin on Pinterest, and decided to model my second pillow after it!


Here are the supplies you'll need:

  • Yarn (colors of your choosing, however I would recommend you to also have white yarn for the back.
  • Knitting needles
  • Scissors
  • Embroidery needle
  • Pillow stuffing (once again, I just cut open an ugly pillow I got for cheap)


Step 1: Knit squares- lots of them. For this I casted on 8 stitches for each one and then knitted until it formed a square. For my project I made 9 squares in each color and then knitted a few extras to make the full rectangle but you can vary that based on the size of the pillow you want to make.


Step 2: Lay out all of your squares in your final formation.
Step 3: Use the embroidery needle to sew all of the squares together. I found it easiest to just start in one corner and add on from there. In order to make the squares come together well and not look too messy, overlap one square over the other and use the same colored yarn as the top square to sew them together. That way you can't see the sewing because the sewing yarn and the knitted yarn are the same color.


Step 4: Knit the back. I would do this step after the squares because then you can see exactly how large your pillow will be once the squares are all sewed together. For my back, I casted on 60 stitches and then kept knitting and measuring and knitting and then measuring until the back of the pillow cover the front. 


Step 5: Sew together the front and back using the embroidery needle. I found this fancy new way to sew together two knitted things and making it look nicer! You can check out the tutorial here.


Step 6: Add stuffing.


Step 7: Finish up by sewing together together the final hole and...

You're finished with your pillow!


Hope you enjoyed this tutorial! Let me know in the comments below how yours went or if you have any questions.

Happy crafting!
-Micayla
Monday, January 21, 2013

Knitted Cinched Headband

Tutorial


Hey guys!

This was one of my first projects I ever did, and one of my favorites! It's great for winter, really cute and super easy to make!


Here are the supplies you'll need:
  • Yarn
  • Knitting needles
  • Scissors
  • Embroidery needle
Step 1: Cast on about 12-15 stitches with the yarn of your choice.

Step 2: Knit until you've made a rectangle that will stretch to the size of your head.

Step 3: End your knitted piece and sew together using an embroidery needle.


Step 4: Pinch the sewed area of the headband to make the cinched area. (same technique as the Knitted Bow Tutorial)


Step 5: Tie a knot around the cinched area.

Step 6: Wrap the area repeatedly. I usually stop once the cinched area is 2-3 inches long.

Step 7: Tie a knot in the back to finish off the headband and you're done!


Hope you enjoyed this craft and your day off from school/work today! 

Happy Martin Luther King Jr Day, and happy crafting!
-Micayla

Sunday, January 13, 2013

Knitted Coffee Cup Sleeve

Tutorial


Hey guys!

This craft was prompted by my good friend, Alexia's, birthday! It was her birthday present, and I'm really proud of how it turned out.


Here are the supplies you'll need:

  • Yarn
  • Knitting needles
  • (optional) To make the flower I used this flower-making loom that my Aunt Sherrill gave me for Christmas! I'm sure it's available at any Michaels or similar store with craft supplies.

(Sorry for the lack of pictures, I was in a hurry to make these in time!)

Step 1: Cast on 20 stitches.

Step 2: Knit a rectangle until it fits around the mug you're making the sleeve for. Make it so that the two ends of the rectangle meet when pulled out because if it's too loose, it won't stay up on the coffee mug. 

Step 3: Add on the attached decoration (bow, flower, or your own creation!) by "sewing" on the decoration with yarn of the corresponding color. 


As for the flower, you can buy the loom and it comes with instructions of how to make the flower.


Well that was probably my 2nd simplest craft I've posted, so I hope you enjoy it! Let me know how yours turns out or if you have any questions.

Happy crafting!
-Micayla